Unfinished wood vanities offer a unique opportunity to customize your bathroom furniture to match your decor and style. Whether you’re working on a DIY project or looking to revamp your bathroom vanity, staining and protecting unfinished wood is the key to achieving a beautiful and durable finish. In this guide, we’ll walk you through the steps to transform your unfinished wood vanity into a stunning piece of bathroom furniture.
Choosing the Right Unfinished Wood Vanity
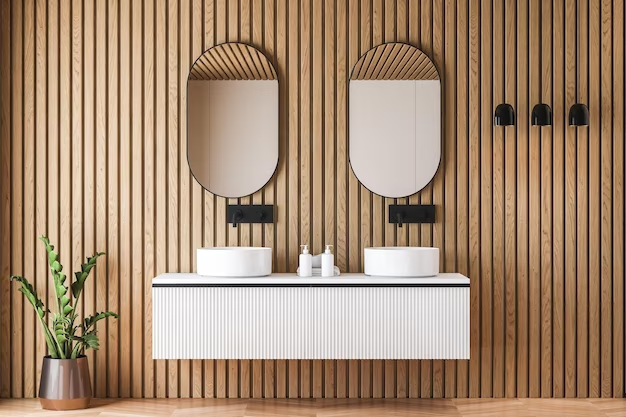
Before you begin the staining process, it’s essential to choose the right unfinished wood vanity for your bathroom space. Consider the dimensions, style, and design that will complement your existing decor. Keep in mind that an unfinished console table can be a versatile choice, allowing you to create a customized vanity to fit your specific needs.
Selecting the Right Base
To kickstart our project, we needed the ideal foundation for our unfinished wood vanity. After extensive research, we discovered that a standard bathroom vanity wouldn’t suffice for our space. Instead, we opted for an unfinished console table, measuring 14 inches deep and 38 inches long. While shorter than traditional vanities, adding a rectangular vessel sink brought it to the same height as a standard option.
This choice allowed us to create a unique and compact vanity, perfect for our bathroom’s layout.
Staining Your Unfinished Wood Vanity
- Step One: Assembly and Sanding
Assemble the console table according to the manufacturer’s instructions, and then lightly sand every surface with 220-grit sandpaper. Wipe away the dust with a tack cloth to prepare the wood for staining.
- Step Two: Applying Wood Conditioner
To ensure even staining, apply a wood conditioner with the grain of the wood. Let the conditioner soak in; there’s no need to wipe away excess. This step is crucial for achieving a uniform stain.
- Step Three: Applying Stain
Choose a stain color that complements your bathroom decor and apply it to the vanity. Wipe or brush on the stain, ensuring even coverage. If the stain appears too light, you can always apply additional coats to achieve the desired shade.
- Step Four: Protecting with Water Repellent
To protect your vanity from water damage, apply a water-repellent product like Gator Hide by Dixie Belle Paint. This water-based product adheres exceptionally well to oil-based stains. Apply three thin coats, allowing each coat to dry completely. Buff the surface with steel wool between coats for a smooth, factory-like finish.
By following these steps, you can transform your unfinished wood vanity into a beautiful and functional centerpiece for your bathroom. Embrace the elegance of natural wood, and enjoy the satisfaction of creating a unique piece that reflects your style.
With its rustic appeal and the opportunity for customization, an unfinished wood vanity is a choice that combines functionality and aesthetics, providing you with a bathroom feature that stands out and complements your design vision.
Invest in the beauty of unfinished wood and create a bathroom vanity that captures the essence of timeless elegance.
Now, you’re ready to embark on your own unfinished wood vanity project, making your bathroom a true reflection of your style and creativity.
Caring for Unfinished Wood Vanity
Caring for unfinished wood vanity is essential to maintain its natural beauty and longevity. Unfinished wood, while charming, is susceptible to damage from moisture, stains, and scratches. Here are some tips on how to properly care for your unfinished wood vanity:
- Regular Cleaning: Dust your vanity regularly with a soft, dry cloth or a microfiber duster. Avoid using abrasive materials that could scratch the wood;
- Gentle Wiping: For light cleaning, use a slightly damp, lint-free cloth. Wipe in the direction of the wood grain to prevent streaks;
- Avoid Excess Moisture: Unfinished wood is particularly sensitive to moisture. Avoid leaving wet items on the vanity, and immediately wipe away any spills or splashes;
- Use Wood-Friendly Cleaners: When needed, use a wood-specific cleaner. Be sure it’s suitable for unfinished wood and follow the manufacturer’s instructions. Avoid harsh chemicals or ammonia-based cleaners;
- Stain and Water Repellent: If your vanity is not already treated with a water repellent product, consider applying one to protect it from water damage. Reapply as needed, following the manufacturer’s recommendations;
- Avoid Excessive Sunlight: Prolonged exposure to direct sunlight can cause the wood to fade or develop uneven coloration. Consider using window treatments or relocating the vanity if necessary;
- Furniture Pads: Use furniture pads or felt protectors under objects that may scratch the wood, such as vases, decorative items, or toiletry containers;
- Regular Inspection: Periodically inspect the vanity for any signs of wear, damage, or changes in the wood’s appearance. Address any issues promptly to prevent further damage;
- Re-staining or Sealing: Over time, the unfinished wood may start to show signs of wear. If needed, you can re-stain or seal the wood to restore its appearance and protection. Sand the surface lightly before reapplying the finish;
- Avoid Harsh Impact: Be cautious while using sharp or heavy objects near the vanity. Avoid dropping items that could dent or scratch the wood;
- Proper Ventilation: Ensure good ventilation in your bathroom to prevent excessive humidity, which can harm unfinished wood. Use exhaust fans or open windows when showering;
- Temperature Control: Maintain a consistent room temperature. Fluctuations in temperature and humidity can cause wood to expand and contract, potentially leading to cracks or warping.
By following these care tips, you can preserve the natural beauty of your unfinished wood vanity and enjoy its unique character for years to come. Remember that unfinished wood tends to develop a rich patina over time, adding to its charm and character as it ages.
Conclusion
In conclusion, caring for your unfinished wood vanity is a labor of love that rewards you with enduring beauty and a touch of rustic elegance in your bathroom. The natural allure of unfinished wood brings warmth and character to your space, but it requires proper care to maintain its splendor.
Regular cleaning and gentle wiping are your first lines of defense against dust and minor stains. Remember, moisture is the enemy of unfinished wood, so swift action is key when dealing with spills. Using wood-friendly cleaners and avoiding harsh chemicals is essential to prevent damage.
Applying a stain and water-repellent adds a protective layer that shields your vanity from potential harm. Be diligent in reapplying these products as needed to ensure ongoing protection.
While your unfinished wood vanity may develop a few marks and scratches over time, these only add to its unique personality. Don’t be afraid to embrace the natural aging process of wood. When necessary, refinishing or resealing can bring back its original luster.
By following these care guidelines, your unfinished wood vanity will not only serve as a functional fixture, but also as a statement piece that exudes timeless charm and elegance in your bathroom. It’s a testament to the enduring beauty of nature, reflecting the passage of time with grace and authenticity.