In this informative article, we’re here to offer you a wealth of insights and expert advice on the purchase and installation of a staircase runner. We warmly invite you to delve into this valuable resource, and we hope you find it incredibly beneficial for your upcoming project.
Expert Tips for Buying and Installing a Staircase Runner
Part 1: Transforming Basement Stairs into an Inviting Space
Embarking on a basement staircase makeover can be a rewarding project, and for me, it’s the second time I’ve tackled such a transformation. Several years ago, when we began refreshing our main floor, we kicked things off with the staircase. In this post, we’ll walk you through the process of:
- Removing old carpeting;
- Preparing and painting a staircase constructed from various wood types.
The insights and tips shared here are not only applicable to your basement stairs makeover but also serve as valuable guidance for your staircase improvement journey. For a comprehensive look at our previous project, please visit this post.
Part 2: Next up in the basement stairs transformation journey
Given that my basement stairs are constructed from less-than-ideal raw wood (neither hardwood nor top-tier quality), Part I of our basement stairs makeover series is dedicated to teaching you how to:
- Skillfully address both large and small gaps between the treads, risers, and side molding;
- Tackle the challenge of wood knots and effectively fill them in;
- Conceal those unsightly nail heads.
By the time you’ve completed these steps, you’ll have a surface that’s ready to be painted, giving the illusion of a meticulously crafted hardwood tread beneath the paint.
Part 3: Installing a Staircase Runner
At Last… Now, we’ve reached the much-anticipated Part II of our Basement Staircase Makeover. Are you prepared to begin the runner installation?
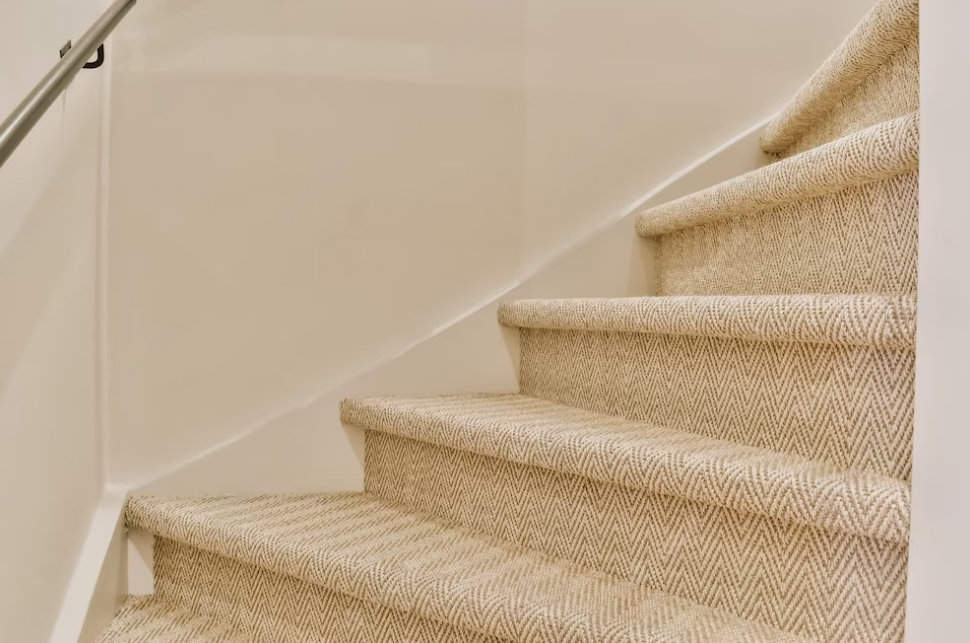
How to Select the Right Stair Runner

Width Measurement:
- To commence, take precise measurements of the tread’s width to establish both the maximum and minimum acceptable widths;
- If you require a visual aid to ascertain the appropriate size, consider cutting scrap fabric or paper and laying it across a tread;
- Also, bear in mind that when a width is denoted as 2.4 feet, it equates to 2 feet and 4 inches, totaling only 28 inches. In my humble opinion, this width falls short for a 40-inch wide staircase.
Length Measurement:
- Commence by measuring both the riser height and the tread depth of your staircase;
- Combine the measurements of the height and depth;
- Multiply this resulting number by the total number of stairs;
- If your runner will be affixed beneath the tread, as illustrated in the photo below, consider adding an extra inch or two for each step;
- When opting for a runner installed in the “waterfall” style, where it drapes over the tread’s edge and is stapled solely at the bottom of the riser, there’s no need to account for additional length;
- Additionally, contemplate whether your runner will incorporate a carpet pad tailored to fit beneath each tread, as this can alter the required length;
- Staircase runners are available in various lengths, so invest the time to obtain precise measurements and carefully plan the installation process before making your purchase;
- In cases where overlapping runners becomes necessary, endeavor to position the overlap on a riser rather than a tread whenever possible. Concealing the overlap within a crease where the riser meets the tread is also advisable.
Stiffness Consideration:
- Certain runners exhibit a high degree of stiffness;
- If you opt for this type of runner, you will likely require a tool known as a bolster chisel, available in the carpet section of your local home improvement store or online through platforms like Amazon;
- The bolster chisel assists in grasping the runner and applying manual force to secure it in position, enabling the staple gun to affix it to the riser;
- In general, installing an extremely stiff runner can prove more challenging than working with one that offers greater flexibility;
- Honestly, in my opinion, contending with a super-stiff runner that poses a high risk of unraveling can be quite exasperating. I recommend considering options that do not possess these characteristics when making your runner selection. Personally, I find it more manageable to deal with unraveling issues in a loosely woven rug rather than struggling to physically maneuver a rigid rug into place while simultaneously stapling it down. However, individual preferences may vary.
Pattern Selection:
- Moving on, let’s delve into the aspect of pattern. If you’re contemplating a runner with a distinctive repeating design (which I’d suggest avoiding for your initial runner installation), you’ll need to determine how the pattern aligns on the steps and calculate the amount of waste involved in matching the repeats;
- On the other hand, a pattern featuring horizontal or vertical lines can be installed relatively straightforwardly. It primarily involves a gradual and careful installation process to maintain the straight alignment of the lines.
Raveling Concern:
- The runners we used in this installation lacked a repeating pattern, but they had a propensity to ravel significantly when cut. Consequently, it’s crucial to meticulously plan the placement of seams to minimize the need for cutting the runners unless it’s absolutely unavoidable;
- In this project, we installed a total of two and a half runners, each measuring 8 feet in length. Now, let’s delve into how it all came together.
Tips for Installing a Staircase Runner
First runner length:
- Positioning the first runner involved aligning its ends with the creases in the steps at both extremities, as shown in the accompanying photo. This method ensures that the 8-foot length remains intact without fraying;
- To enhance the runner’s durability, we applied two strips of double-sided carpet tape to each step, with each strip measuring approximately 27 inches in width and 3 inches in depth. You can find this type of tape in the carpet section of your local home improvement store;
- While it’s difficult to confirm the extent of its impact on wear and tear, using this double-sided carpet tape appeared to be a reasonable precaution, especially for this loosely-woven jute material;
- We affixed the runner in place using a pneumatic staple gun. If you don’t already own one, we recommend either purchasing or renting one for the project. Staples were attached approximately every inch along the horizontal under the tread roll at the top of the riser and at the bottom of the riser.
Second runner length:
- The second runner’s ends overlap with those of the first runner within a crease, as depicted in the provided photo;
- While this overlap may appear quite prominent when magnified in the photo, it virtually vanishes when observed in person;
- Once the end pieces are properly overlapped, proceed to install the second runner along the subsequent section of steps, following the same procedure as the first;
- Ensure precision by measuring both the left and right sides of each tread to maintain proper centering, and consistently adjust the runner to keep the horizontal or vertical lines impeccably straight;
- By the conclusion of the 16-foot installation of the second runner, it will present itself as a singular, continuous runner rather than two distinct pieces.
Third runner length:
The portion removed from the third runner completes the bottom three risers and two treads. In the image provided, the manufacturer’s end piece was inverted beneath the jute and securely stapled to the underside of the bottom riser. This creates an elegant and polished appearance where the runner seamlessly meets the floor, eliminating the need for any cuts in the runner itself.
- The runner was installed upwards (from the floor) along the two treads and three risers;
- No cutting of the runner was done until it was fully stapled in place, except for the tucked portion under the tread;
- To prevent excessive unraveling, a piece of double-sided carpet tape was applied along the underside of the runner, right at the cut’s edge;
- The cut was then executed, and a small section of the runner was folded back onto the double-sided tape and securely stapled at the top of a riser, directly beneath the tread roll;
- In the photo below, please direct your attention just below the tread that supports the pot;
- While the fold may be slightly noticeable, it is a significant improvement compared to the runner unraveling;
- The double-sided tape effectively stopped the unraveling issue;
- The additional jute roll, while creating a slight bulge in the crease, is essential due to the potential for unraveling;
- Nevertheless, there is no pressure on the runner at this overlap, so I anticipate that the combination of double-sided tape and staples will adequately secure the runner.
Conclusion
The journey to transform your basement stairs into a beautiful and inviting space through the installation of a staircase runner is an exciting and rewarding endeavor. Armed with the knowledge and insights shared in this comprehensive guide, you have the tools to elevate your home’s interior design, enhance its value, and create a stunning focal point within your living space. From selecting the right runner size and pattern to mastering the installation process, this article has covered every aspect of the project with meticulous detail.